
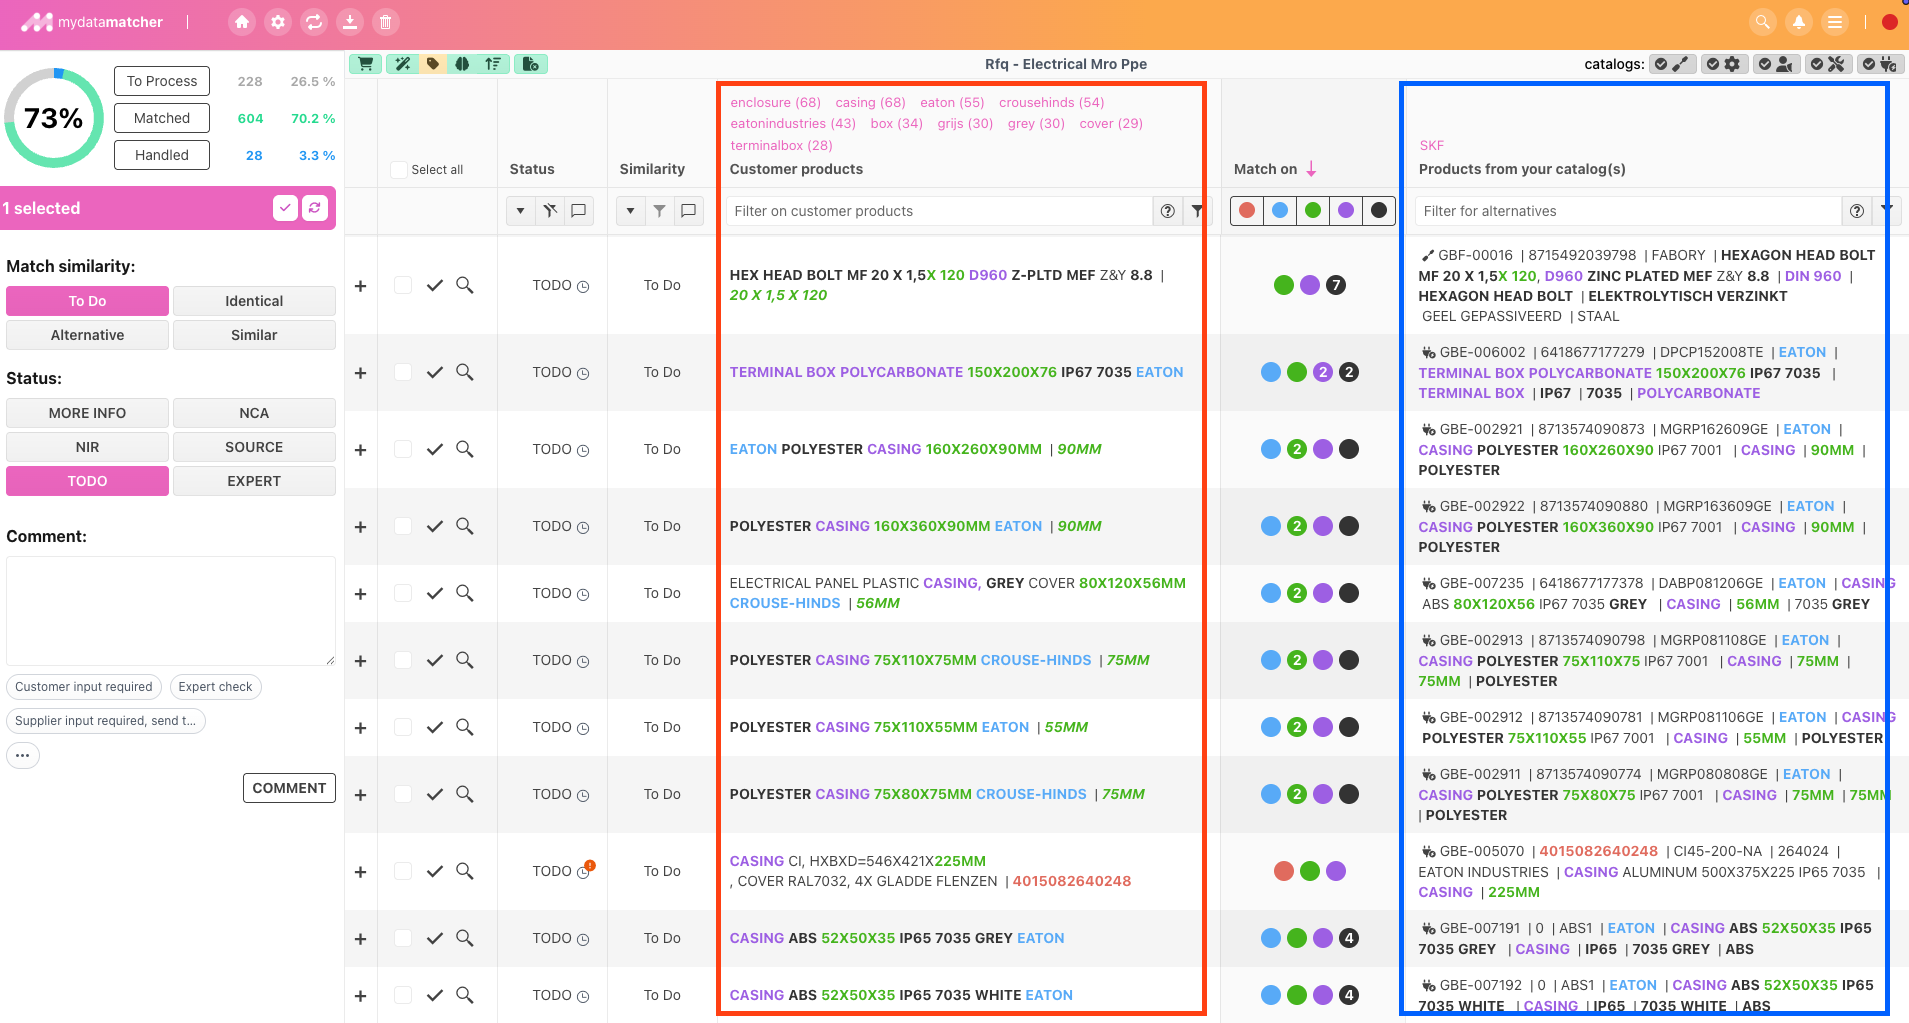
The right-hand column in the blue frame shows the items from your catalog. Each row shows the best match with the item requested by your customer. The items that your customer has requested are displayed in the red frame on the left-hand side. For each item requested by the customer, the system finds 30 candidates, but only the best candidate for each customer item is displayed here.
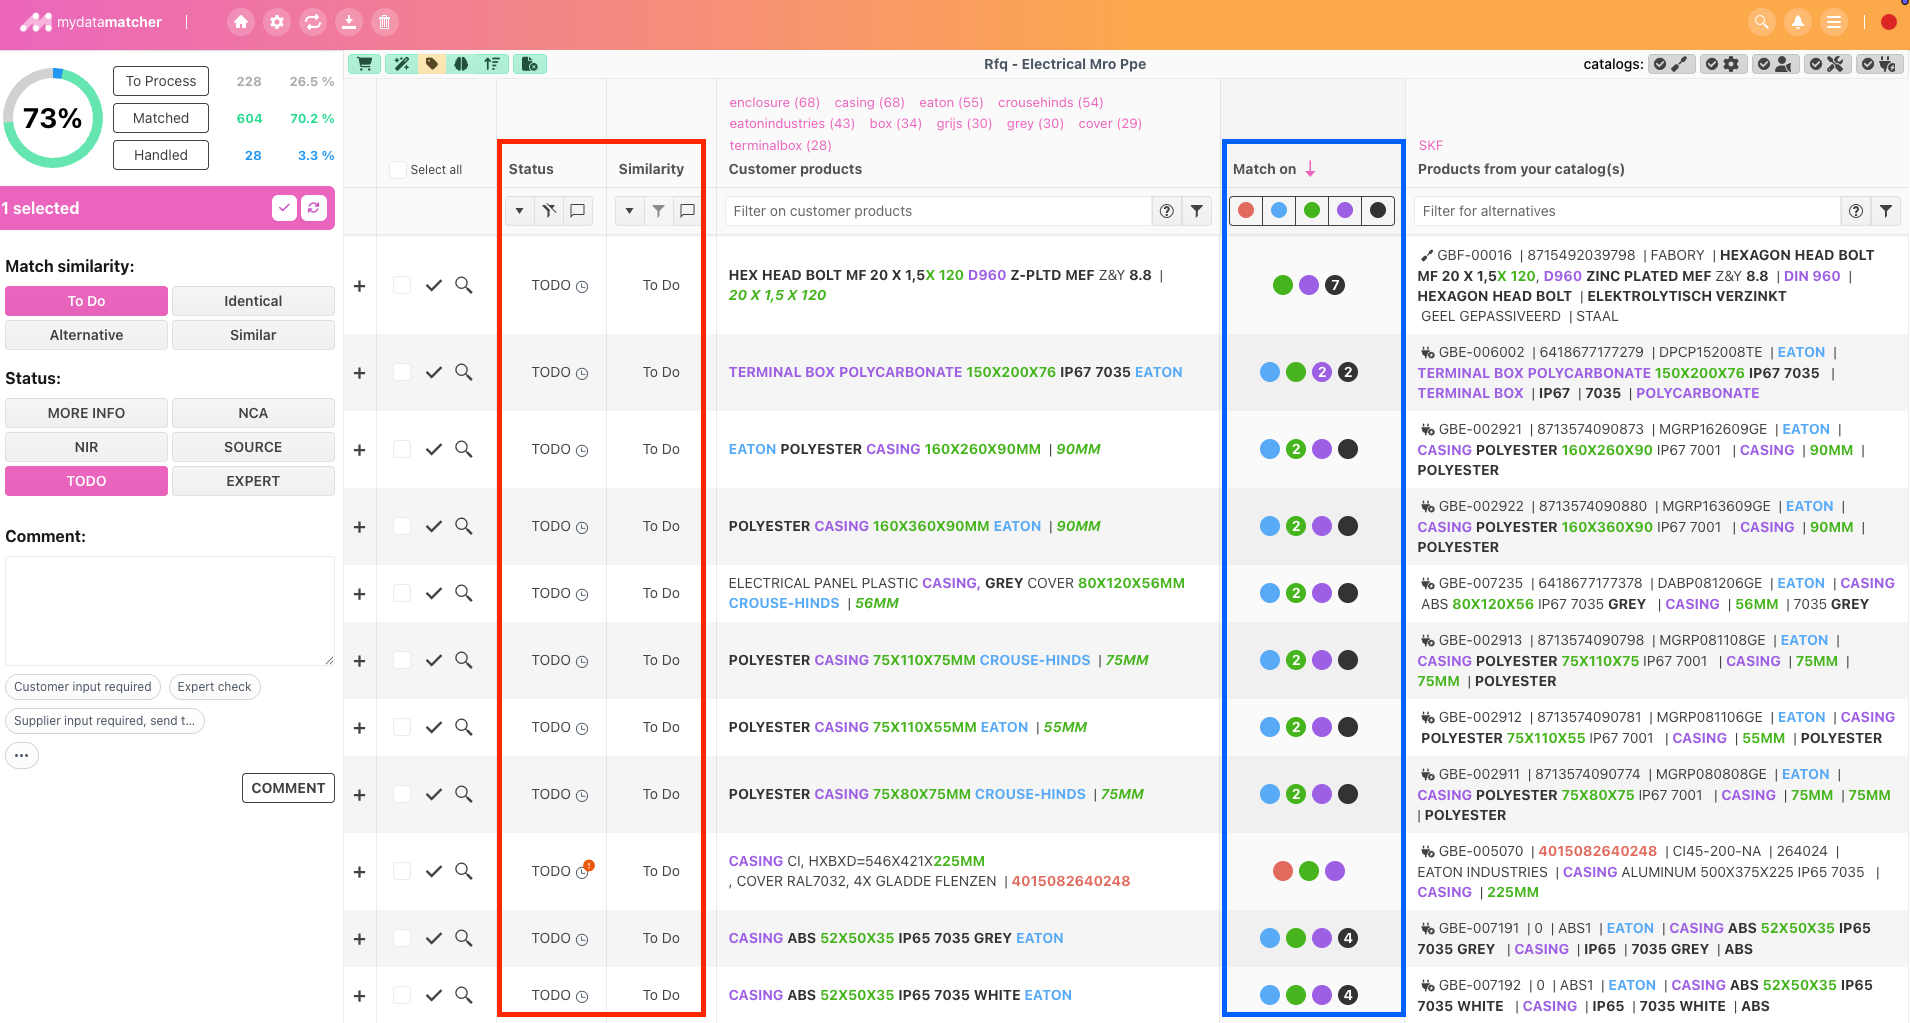
In the blue frame:
Mydatamatcher uses AI and additional algorithms to identify the best candidates for a match. The colored dots provide hints and insights as to why a match is suggested:
-
Red: indicates overlaps for unique identifiers such as product numbers.
-
Blue: indicates overlaps for restrictive IDs, such as a manufacturer name or serial number.
-
Green: indicates overlaps in dimensions or measurements.
-
Purple: indicates overlaps with product names or product groups.
-
Black: indicates overlaps with text.
If a number is displayed in the item, it indicates the number of overlaps for that item. For example: If the black dot contains the number 2, 2 text overlaps were found.
In the red frame:
The status column shows you whether an item is "To Process", "Matched" or "Handled". There can be various similarities for the "matched" status. By default, there are 3 similarities:
-
Identical: this is a similar match
-
Similar: different brand, same specifications
-
Alternative: different specification, but suitable for the purpose
The similarities can be configured depending on the customer environment.
When an item is Handled, it is not matched but given a different status. This depends on the choice of processing options. The default options for handling are:
-
MIN: more information required from the customer.
-
EXP: An expert must check the proposed product.
-
NCA: No candidate found; the item will also not be part of the range. Often a completely irrelevant product.
-
NIR: Not in the range; the item is not in the range, but could be.
-
NEW: The item is not in the range, but must be added.
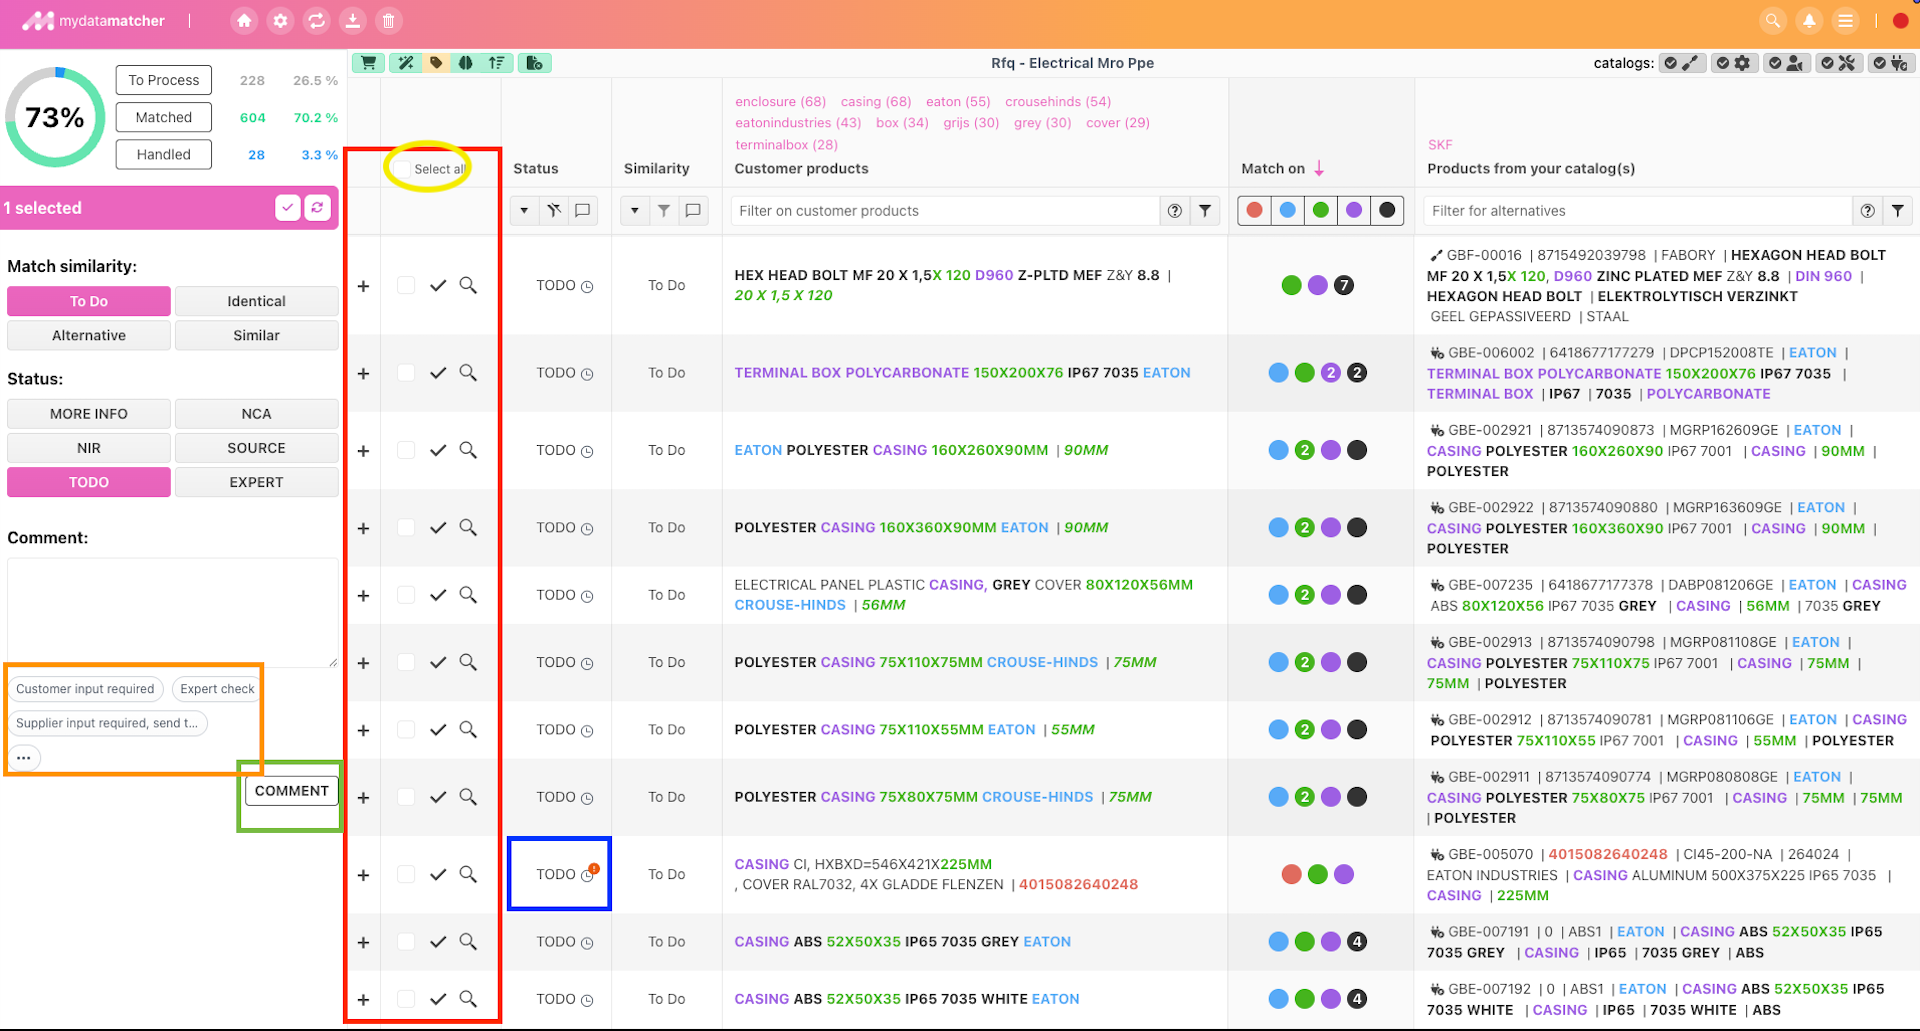
In the red frame:
The column contains various actions:
-
You can select/deselect rows individually or select all rows on the page by “select all”-> yellow frame
-
You can confirm the match by clicking on the match icon with the checkmark.
-
You can switch to the alternative candidates and to the manual search page using the magnifying glass icon
-
The small plus icon ives you the option to show or hide the detailed information per product line.
Orange frame: select a pre-defined comment and click “comment” in the green frame to populate the comment box and have the Mydatamatcher save the comment (these will show in the export afterwards)
Blue frame: when a red exclamation mark shows, Mydatadroid will explain to you why it did not automatch this item
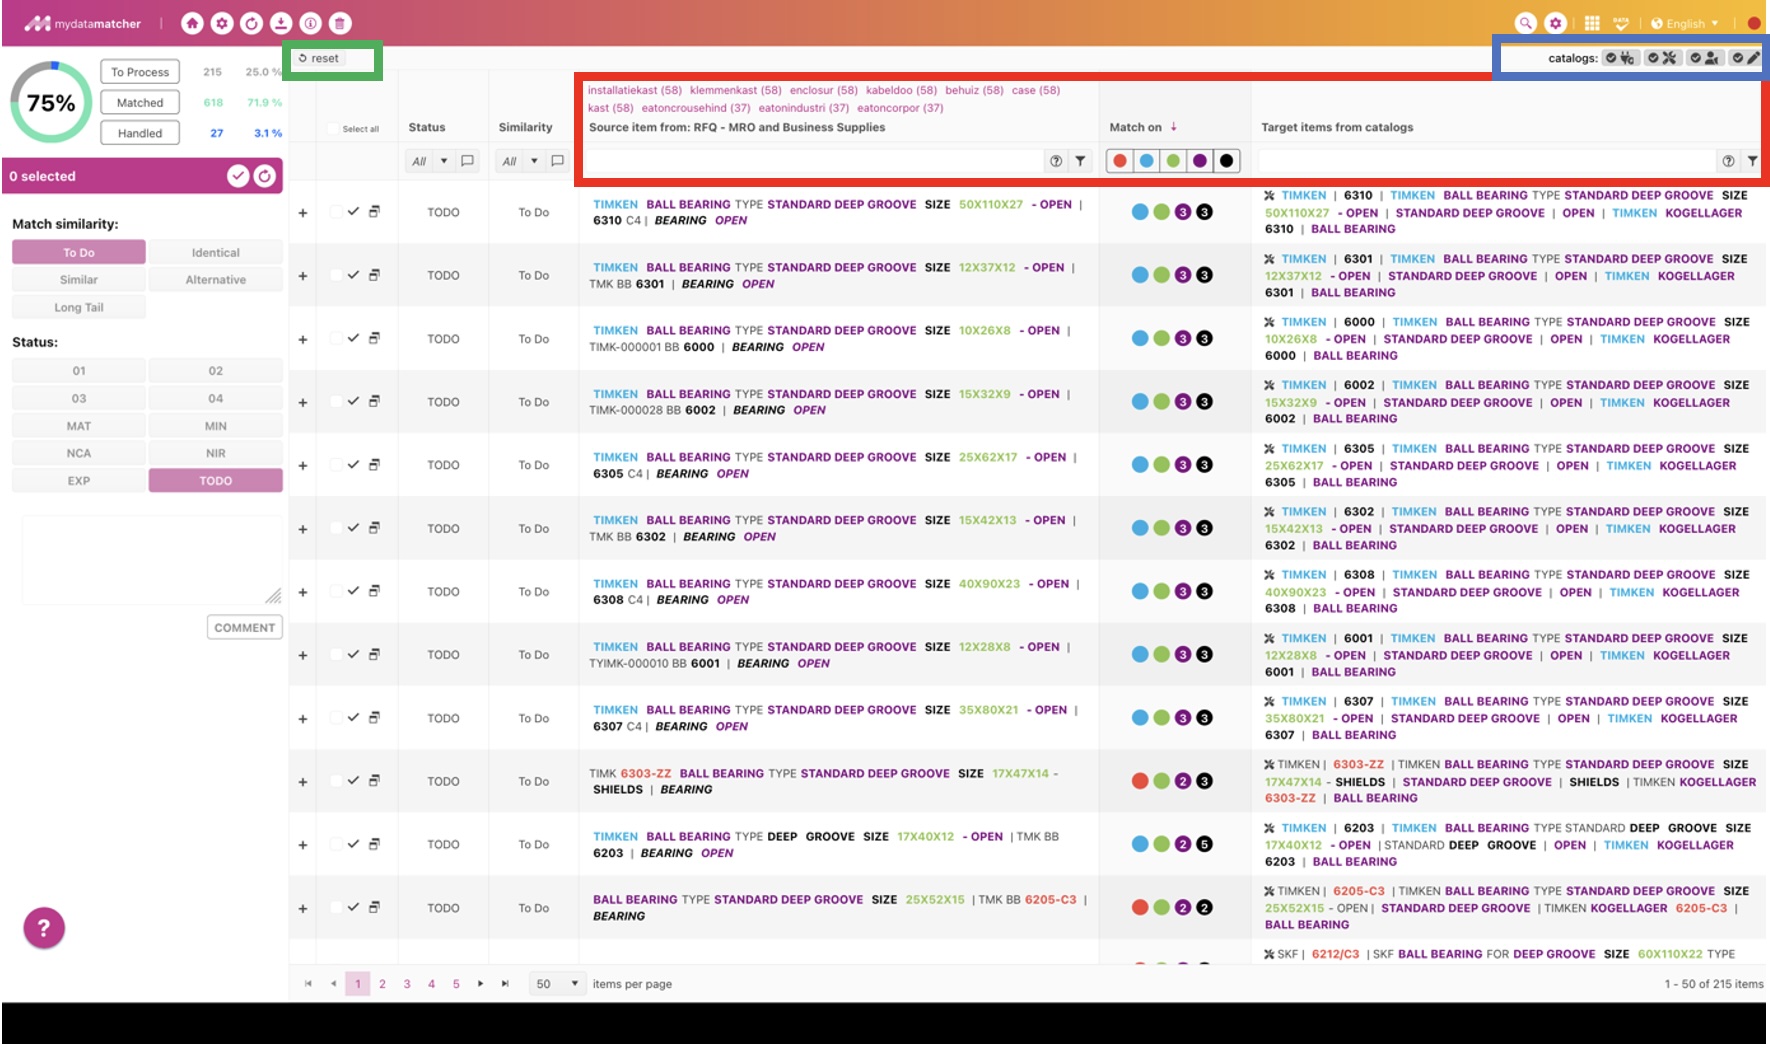
In the red frame:
There are a number of filters and a sort option. All filters can be filled with terms/words by double-clicking on them in the text below or by simply typing them in:
-
In the left column, the filter filters by the product list that the customer has sent.
-
In the middle column, you can filter by clicking on the dots. The solution will then only show products that overlap with the selected item(s)
-
In the middle column you can click on the arrow above the colored dots and next to the words "match with" the sorting will change from products with the highest overlap to products with the lowest overlap.
-
In the right column, the solution is filtered out to the 29 alternative candidates that are on the background of each line product.
Advanced option for filtering:
In the text filters, you can use wildcards by inserting a ? to replace only one character or a * to replace multiple characters. You can also exclude terms by placing a - in front of a term; no products containing this term will then be displayed.
Above the left column you will find the product name and above the product name you will find quick filters. These are generated automatically depending on how often a term appears in the list of items specified by your customer.
In the blue frame:
Here you can see your catalogs that you selected for matching when you created the project. If you click on these catalogs, you can select or deselect them. If you deselect them, the items will be excluded from the list of 30 candidates.
In the green frame:
You can use the "Reset" button to update the overview, whereby the products you have matched or edited will disappear from the overview and only "to be edited" products will remain in the overview.
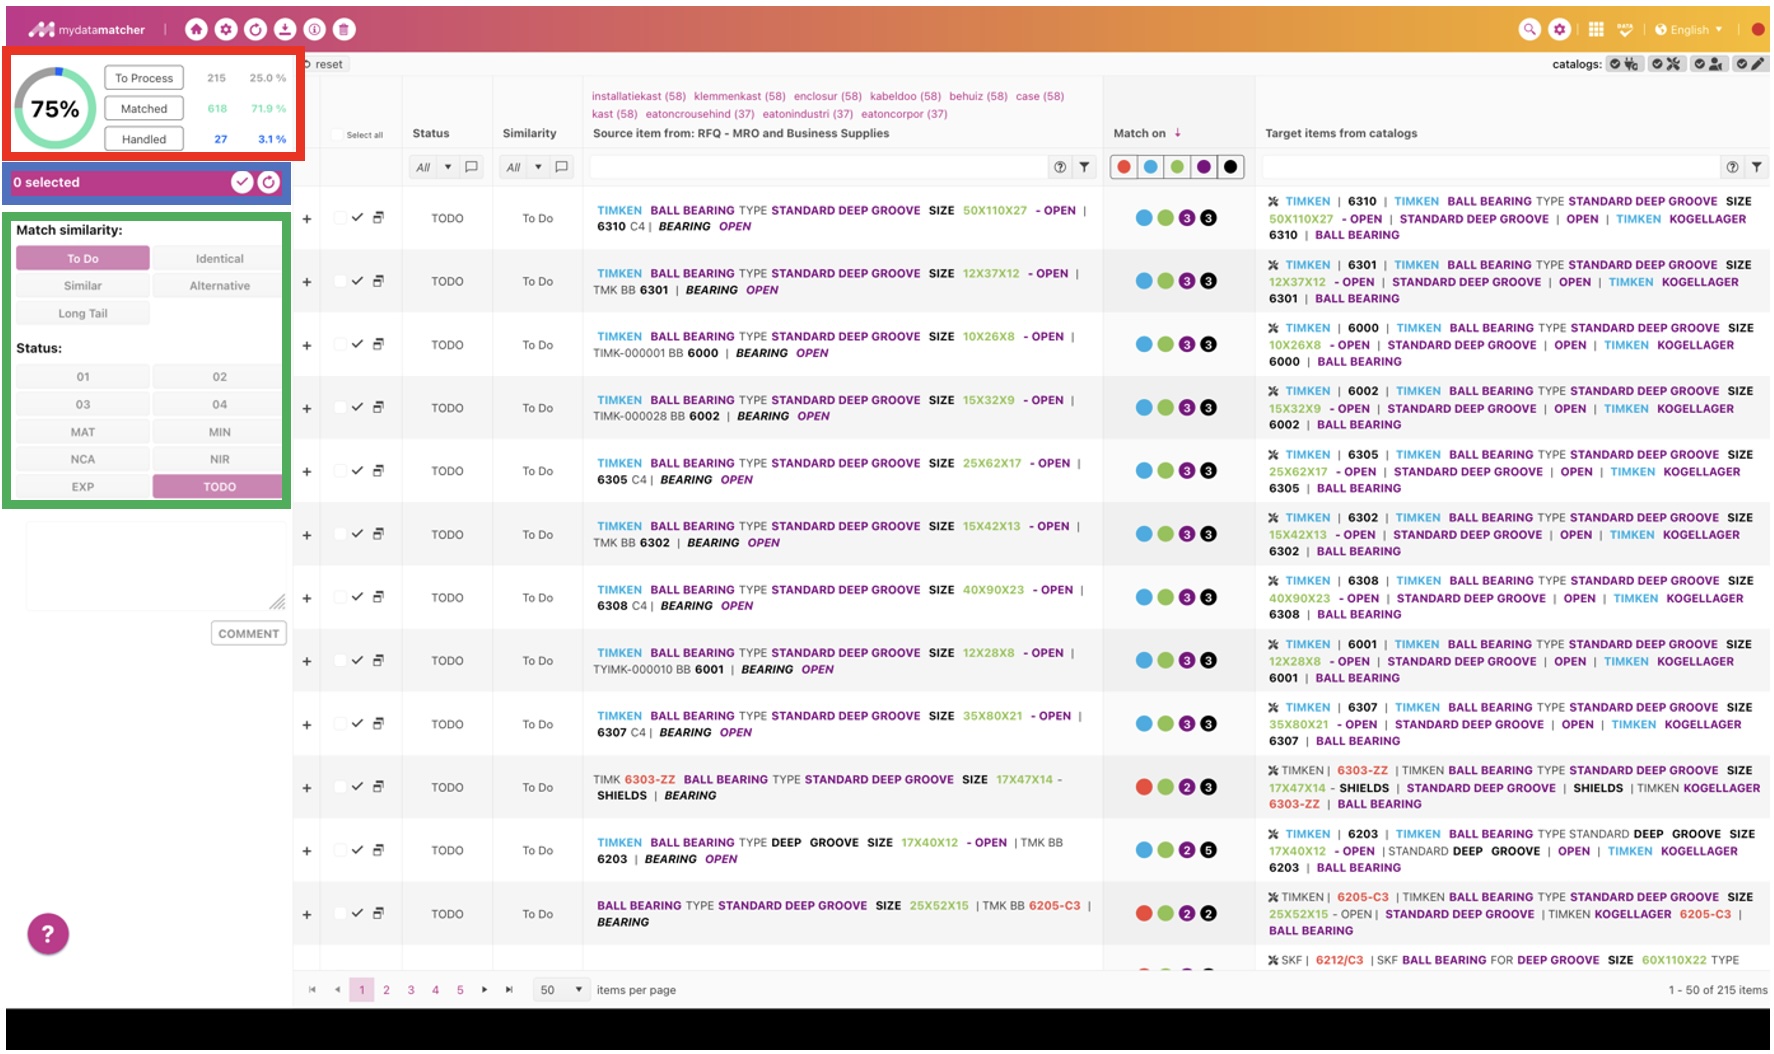
In the red frame:
We see an overview of the progress in a diagram, numbers and percentages. It is divided into three folders:
-
To be processed: Product lines that either need to be reconciled or edited
-
Matched: Product lines that have been matched
-
Processed: Product lines that have already been edited.
If you click on one of the folders, you will jump to the overview with the products to be edited, matched or edited.
In the blue frame:
The bar shows the number of products that have been selected using the checkboxes in the column under "Select all". If you click on the tick symbol, the selected rows are confirmed as matching.
If you click on the refresh icon, the matching or edited products are removed from the overview and only the products that still need to be edited are displayed.
In the green frame:
In the green frame, you can select all possible options for matching or editing. This can be a similar match or a MIN (More information required) or any other available option. The options can be configured so that you may have other options available than those presented in this manual.
Add comment: If you select an option other than identical match, a comment field will appear. Here you can add an additional comment to a product line or to several product lines at once if several lines are selected. In these cases, a comment field will appear in the status or similarity column at the product line level.
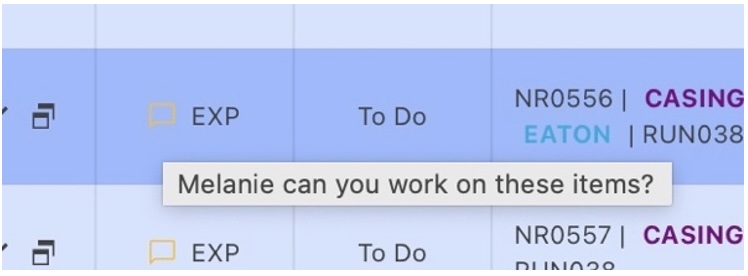
If you want to change the status of a product that has already been matched or edited, simply select the product and choose the option "edited" or "matched". If you select "To do", the product will not be matched or edited and will appear in the "To do" folder.
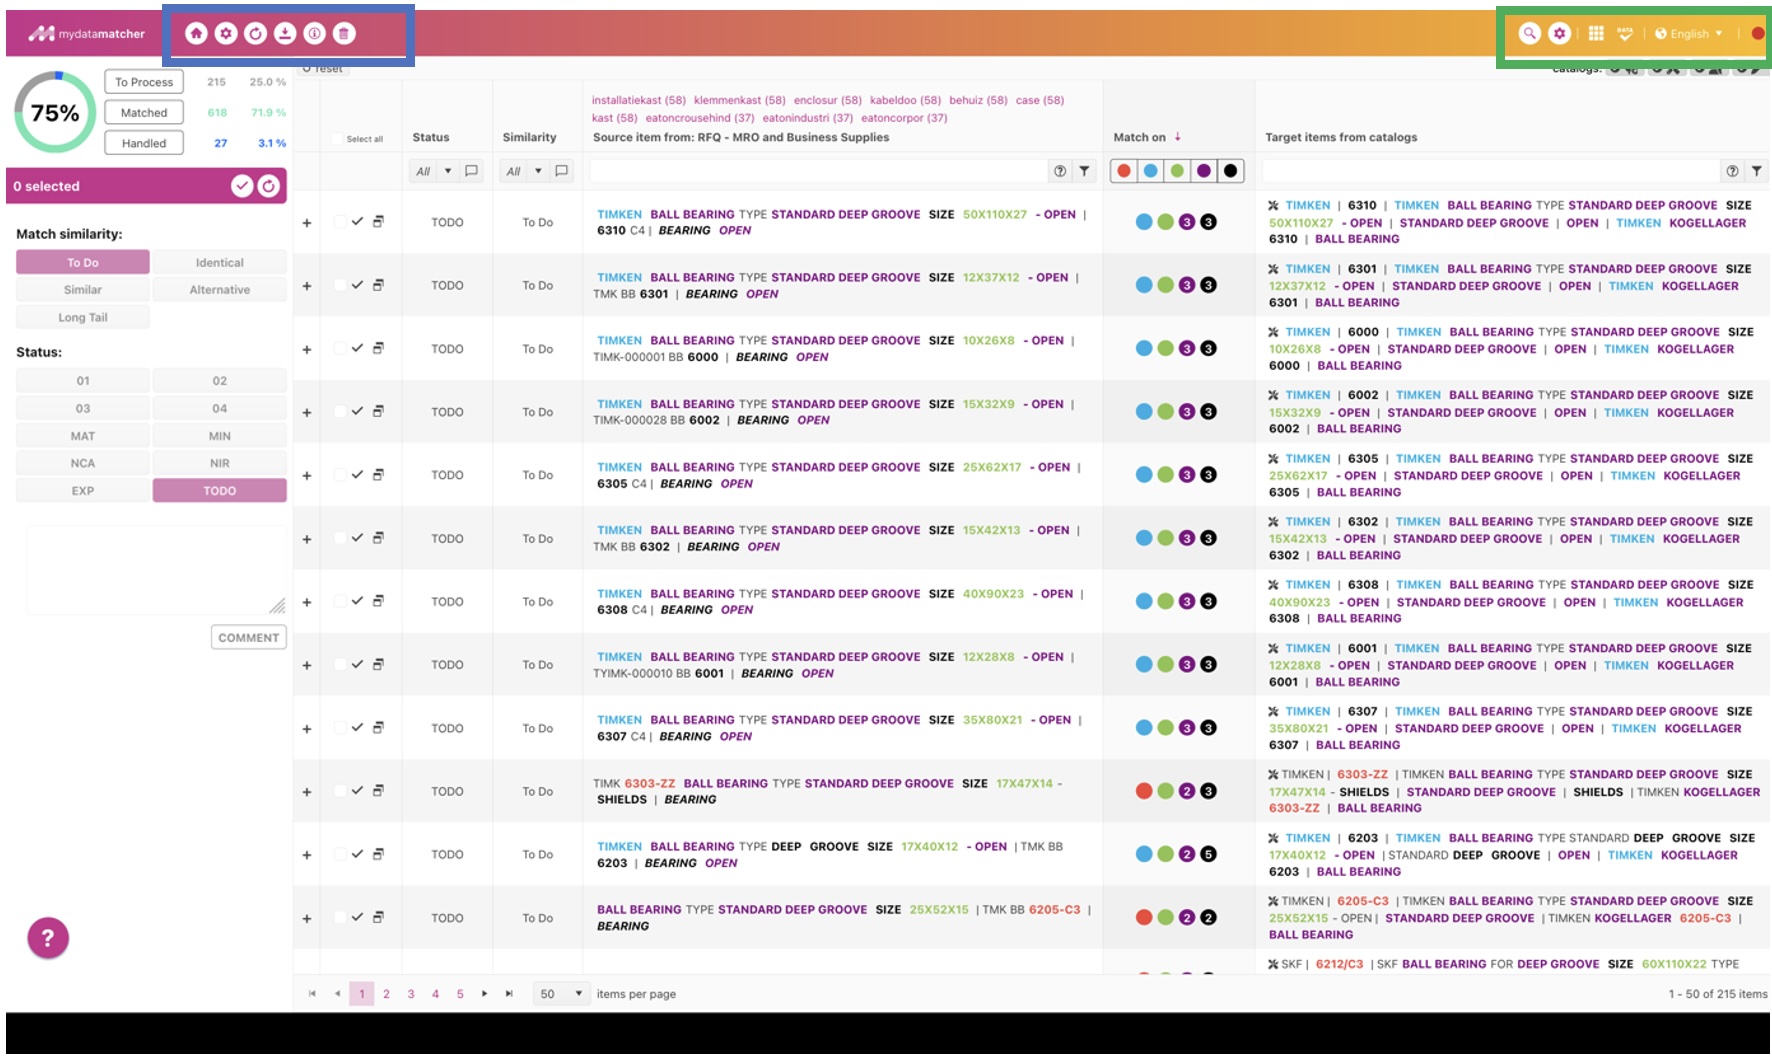
In the blue frame:
You have a number of options:
-
If you click on the home icon, you will be taken to the project overview page
-
If you click on the settings icon, you will be taken to the project settings for the project you are currently working on. You can make changes, after which the solution will try to find new candidates. Products that have already been matched and edited do not change their status.
-
The refresh icon is used to perform the synchronization again. This function is used if you have changed the system settings in the background, e.g. if you have changed the rules for automatic matching or added synonyms.
-
If you click on the download icon, you will be shown options with various standard formats for downloading the result.
-
If you click on the information icon, you will receive the solution manuals in different languages
-
If you click on the trash can icon, the project will be archived.
In the green frame:
You have a number of options:
-
If you click on the magnifying glass symbol, you will be taken to Mydatasearch. Here you can search directly in your catalog
-
If you click on the settings icon, you will be taken to the backend (if you have the appropriate rights)
-
If you click on the tile icon, you will be taken to the main menu.
-
On the far right, you can select the languages in which you want to use the user interface.